Implementation » History » Version 18
« Previous -
Version 18/74
(diff) -
Next » -
Current version
SERRA FONT, Anna, 03/22/2015 03:37 PM
Implementation
- Table of contents
- Implementation
At this point we were familiar with the system analyse of a link budget, knowledge acquired throughout the different subjects imparted in the master course and especially thanks to the realisation of the project 2 (Design of a regional multi-beam satellite system), that has an strong bond with the present project.
Diagram block of application development
The diagram below shows the planning with the different phases we have designed in order to perform the successful and coherent development of the tool.
{UPDATE} Block diagram

<div style="margin-left: auto; margin-right: auto; width: 25em">Figure 1: Project plan diagram.
</div>
In short, the first steps were to decide what would be the basic structure of our link budget program and identify all the parameters and possible calculations, as well as the logical place to perform them in this structure. Thus, a preliminary design with the fundamental and simplest conditions has been performed, to then add gradually other features in order to improve its capabilities. Finally, verification of results and testing with subjects has been done in order to finish the complete design of the tool. These steps are further explained below.
Overview Application Plan
At the beginning of this project it was essential to ask ourselves about what we would expect of tool a Link Budget Tool. For instance, some thoughts we considered were: If I had an analysis tool... what would I do with it? What would be the settings I give? What would be the results that I expect?
Hence, in order to design a tool to help with the comprehension of the link budget analysis, we have had to ask each time the question "How will I present my results and information?”. This leads us to the GUI (Graphical User Interface), one of the key points of this project.
When we thought about all this aspects, we know what it has to do, which are the necessary parameters and results we want to show, etc. At this point, we can start to design our screen according to this. Thus, we identified the topology of the satellite communication system and we divided it in the following block groups, that corresponds to different tabs in the software tool:
- Service: The user introduces the requirements of his system (i.e. modulation, channel BW, code rate, margin, etc.), and the tool gives as outputs the required information bit rate, overall link carrier-to-power noise power ratio, etc.
- System Geometry: The user introduces the latitude and longitude of the earth stations and the satellite and he obtains as outputs the corresponding azimuth and elevation angles and the range between satellite and each earth station.
- Uplink: The user introduces all the parameters involved from the transmission on earth station A to the reception at the satellite, including the uplink path losses depending on the weather conditions. All the results associated with uplink are computed, being the uplink carrier-to-power noise spectral density the most important result.
- Payload: The user introduces the input back-off and the carrier-to-power intermodulation power ratio is computed.
- Downlink: Similar to uplink, but here the parameters introduced by the user are those involved from the satellite transmission to the reception on earth station B.
- Overall link: The user can see a summary of the principle results obtained in the previous tabs and introducing the carrier power-to-interference power ratio of the system the tool determines if the link budget requirements are achieved with the given specifications or not.
Preliminary design
It is known that link budget equations can become messy and complex and this calculus involve several aspects and conditions, furthermore, link budget can be analysed from different points of view. Globally, it can be defined with the following approaches:- The first approach is a feasibility study: The user gives the features of the system, the targeted service, the bit rate, the bit error rate, etc., and the link budget says either if it is possible with this margin or if this is not possible (negative margin).
- In the second approach the user also defines the features of the system, and then the link budget says what is possible to do in terms of bit rate, bit error rate, etc.
- Finally there is a third approach where the user says which is the service he would like to have, and the link budget tool finds all the system settings. But this approach is much more complex, because as there are several parameters to define, it turns into a lot of different configuration options.
tip. Explicar los primeros cálculos básicos del link budget. The idea was to at first design the main link budget.
Added features
tip. Citar y detallar un poco todas las características añadidas a fur et a mesure.
Final design
In Figures 1 to 7 are shown the captures with the final design of each of the different tabs of the SatToolLink.
Service:

<div style="margin-left: auto; margin-right: auto; width: 30em">Figure 2: First window of SatlinkTool - Service.
</div>
System Geometry:
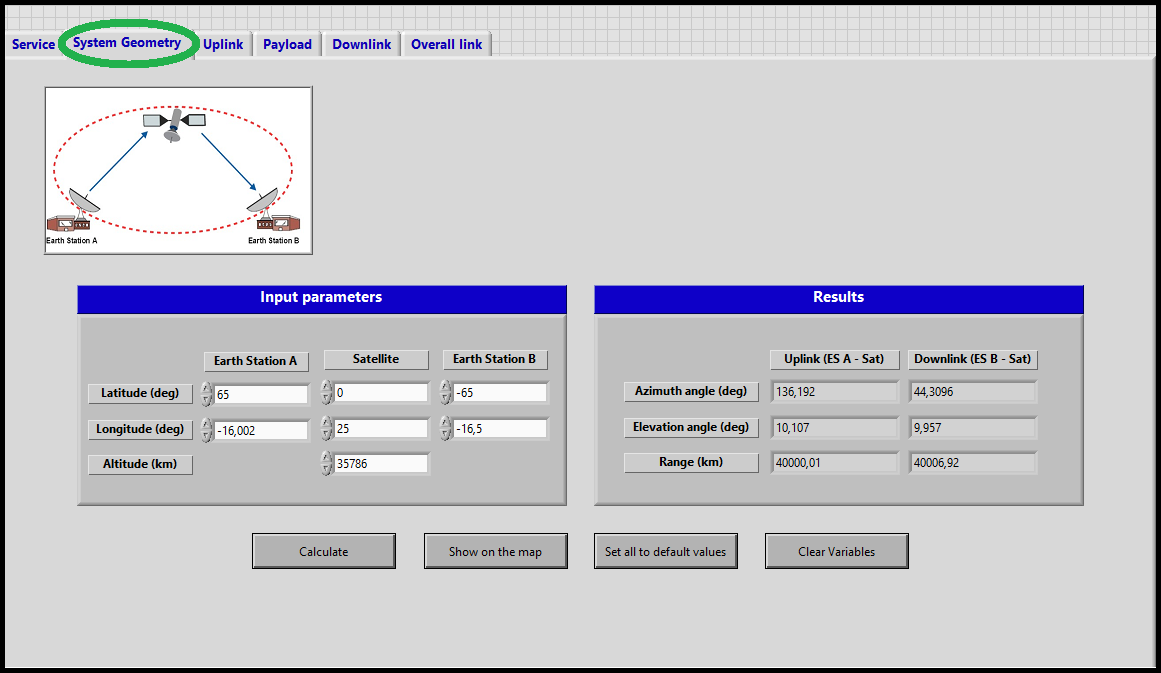
<div style="margin-left: auto; margin-right: auto; width: 30em">Figure 3: Second window of SatlinkTool - System Geometry.
</div>
Uplink:
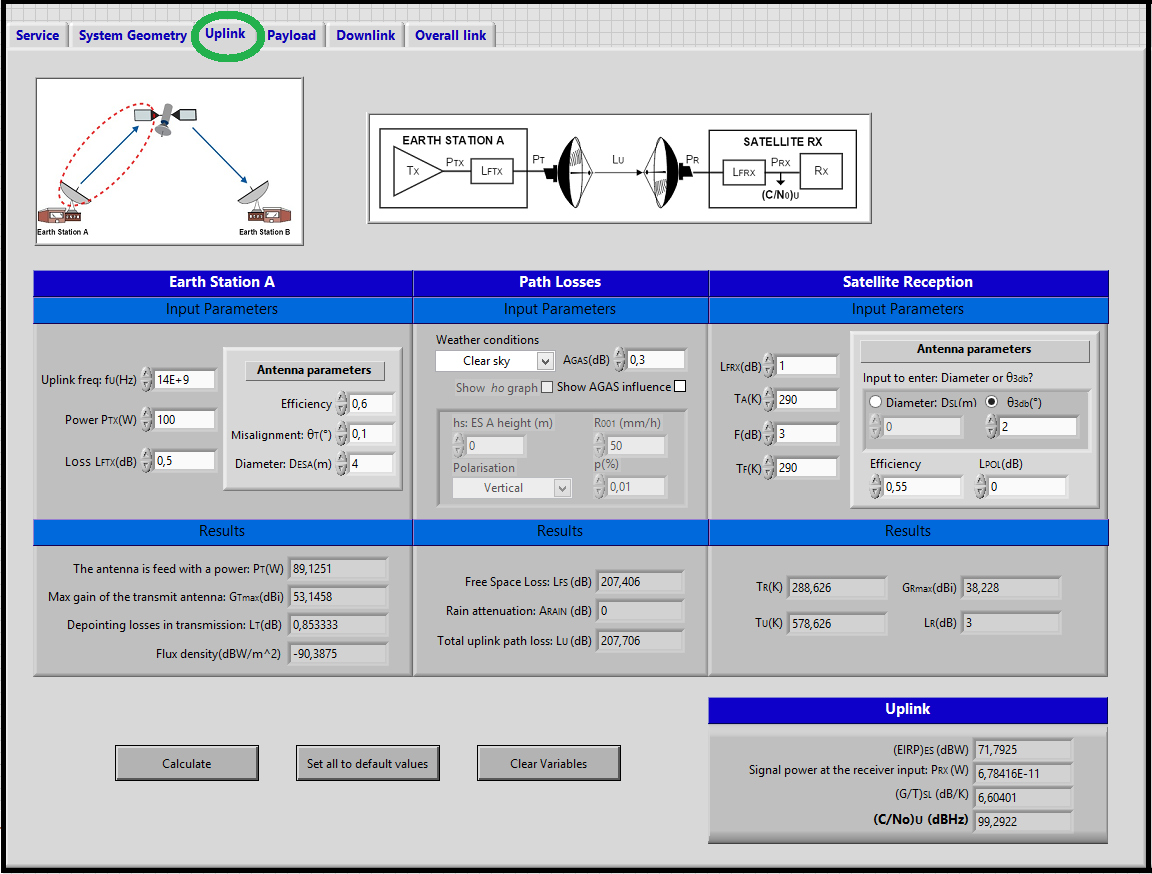
<div style="margin-left: auto; margin-right: auto; width: 25em">Figure 4: Third window of SatlinkTool - Uplink.
</div>
Payload:
- Transponder window:
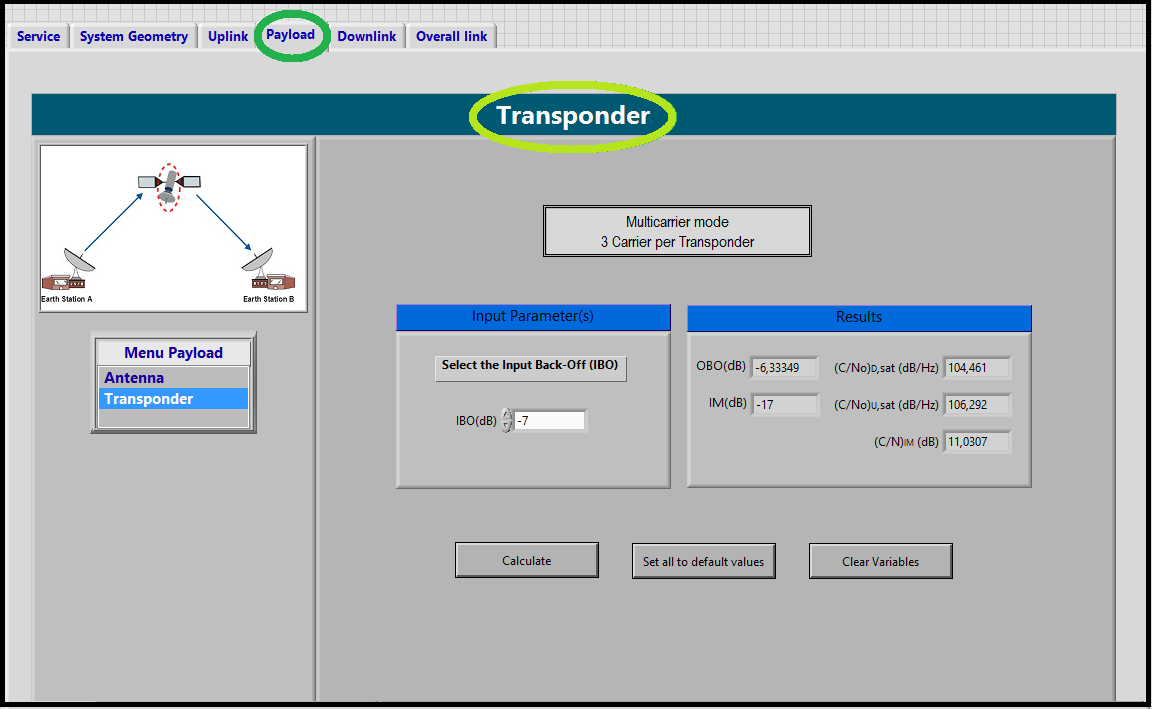
<div style="margin-left: auto; margin-right: auto; width: 30em">Figure 5: Fourth window of SatlinkTool - Payload: Transponder.
</div>
- Antenna window:
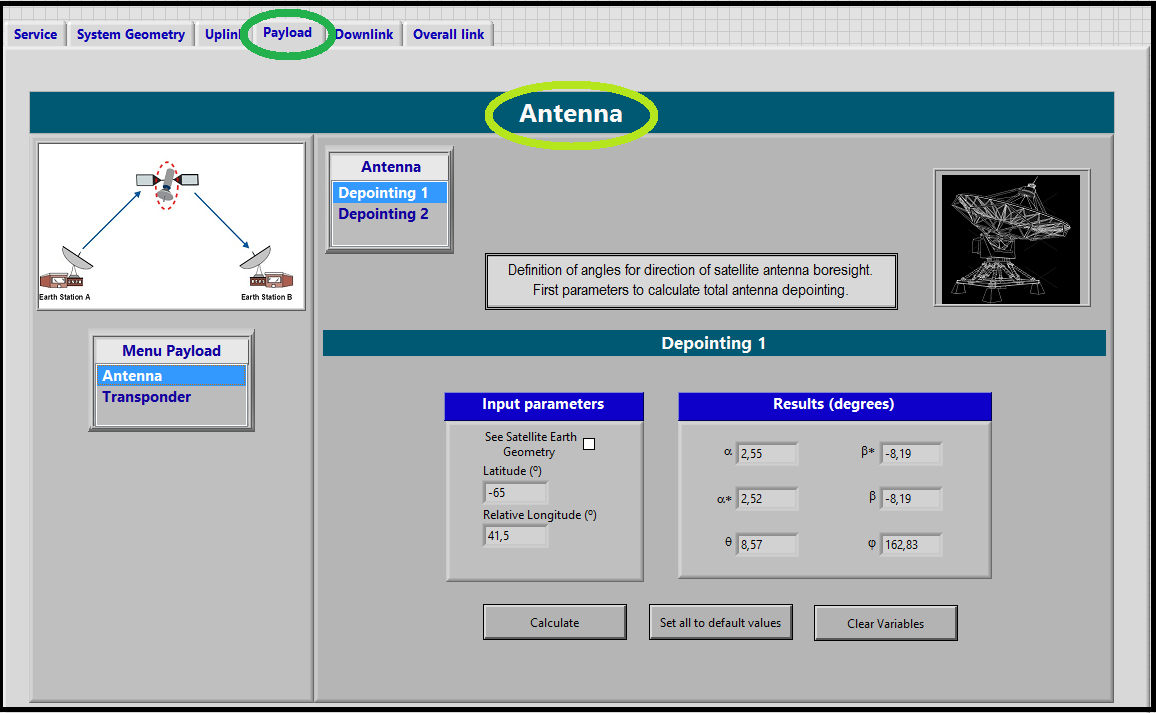
<div style="margin-left: auto; margin-right: auto; width: 30em">Figure 6: Fourth window of SatlinkTool - Payload: Antenna.
</div>
Downlink:
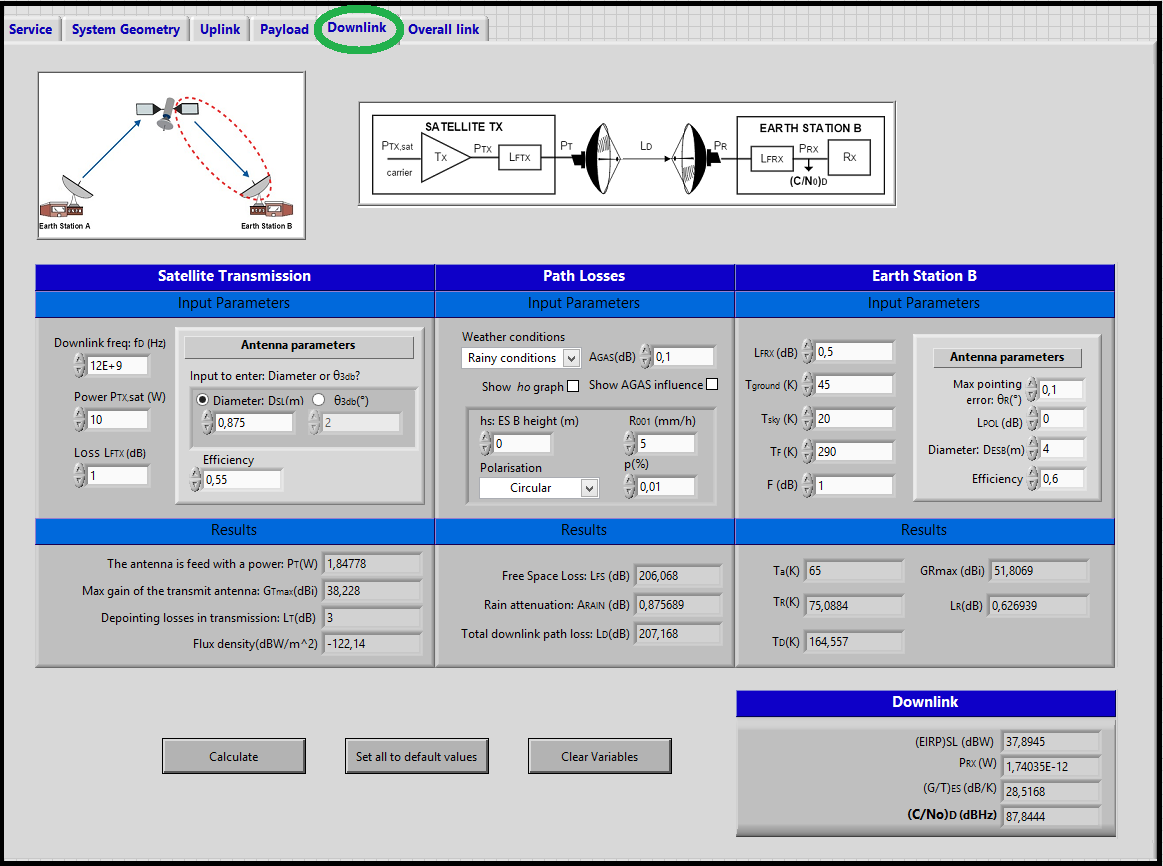
<div style="margin-left: auto; margin-right: auto; width: 25em">Figure 7: Fifth window of SatlinkTool - Downlink.
</div>
Overall link:
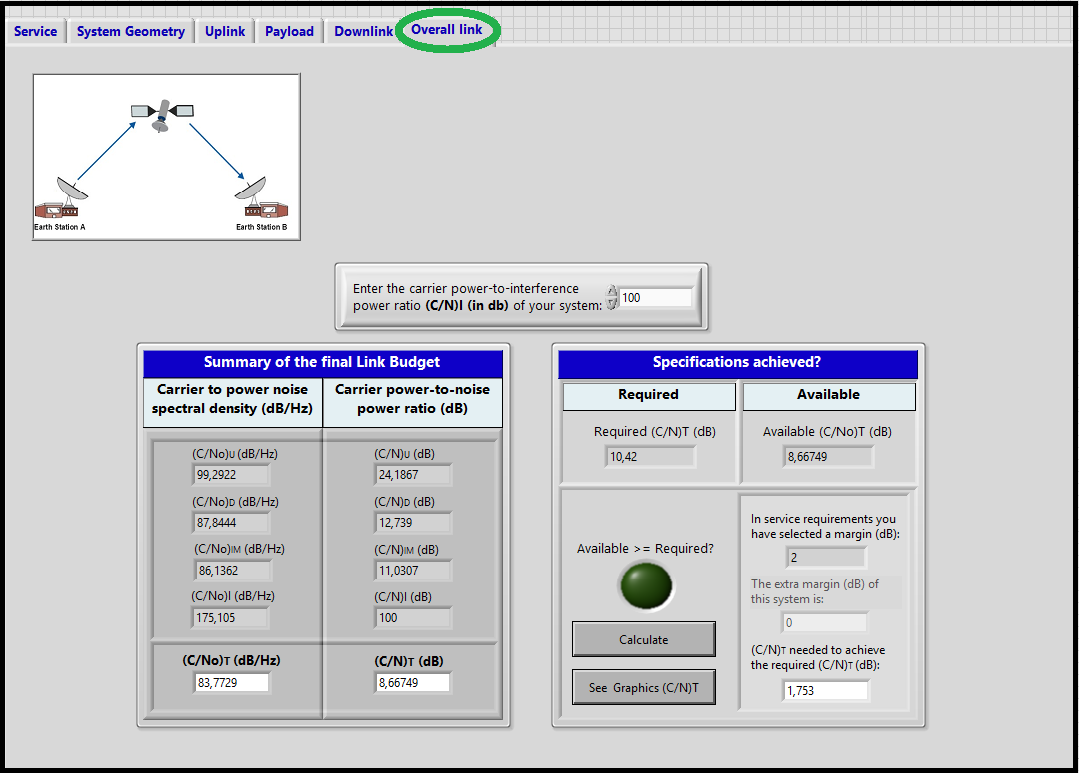
<div style="margin-left: auto; margin-right: auto; width: 25em">Figure 8: Sixth window of SatlinkTool - Downlink.
</div>
Validation & Final tests
tip. Explicar que se han hecho tests y cómo hemos comprobado resultados
Delivery Application
tip. Breve párrafo diciendo que el logiciel está terminado e introducir el manual de usuario que se detalla en How to do?
